I have always loved painting my nails. Every now and then I play with something different..
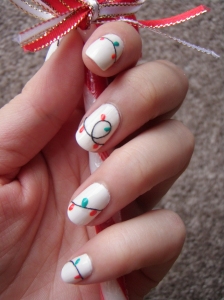
This is Christmas lights. I got this idea from The Beauty Department.
What I used: Orly rubber base coat, no-brand white nail polish, Missha bright red nail polish, Missha green nail polish, Seche Vite top coat, black cotton thread (precut to approx. 20mm), tweezers, clippers or scissors, toothpicks.
How I did it: After the base coat dried, I apply a the white nail polish until it has a solid white colour. Then I applied a thick layer of top coat and use the tweezers to apply the black thread on the top coat (I had to wet the thread so that the fibres don’t fray). Do this one finger at a time to avoid ruining the nails. When the top coat is dried, cut the extra length of the tread with the clippers/scissors. I then dip a toothpick into the red polish and green polish to create the lights. Apply top coat to finish.

I love this!!!!
Thank you! I got heaps on compliments for this design!
Aww, these are adorable!
Thank you! Thanks for reading
I love this design! It’s such a clever idea using the thread 🙂 I’m really enjoying your blog by the way so I am now following… Thanks for stopping by Bewitchery xx
Thank you for the comment! 🙂 Do visit more!
These are really cute! The thread is such a cool idea 🙂
Thank you! I can’t draw nice lines with my shaky hands so threads are quite good to use! Only thing you need to do before you put it on your nails is run the thread on a piece of wax or wet it so the fibres don’t fray!